
Add a Requisition
PeopleSoft Financials 9.2
Within this document, take me to...
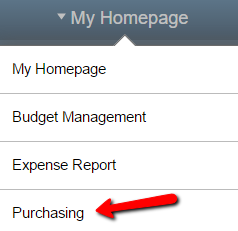
Select the Purchasing homepage

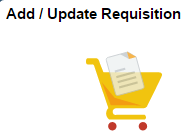
Choose the Add/Update Requisition tile
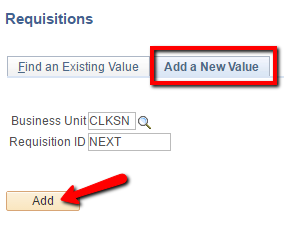
On the Add A New Value tab, select Add
Note:
-
Business Unit:CLKSN and Requisition ID: NEXT will default and should NOT be changed
-
The Find an Existing Value tab is used to look up a requisition that has already been created
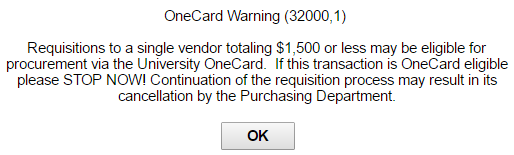
The OneCard Warning will appear, hit OK to acknowledge the warning and continue
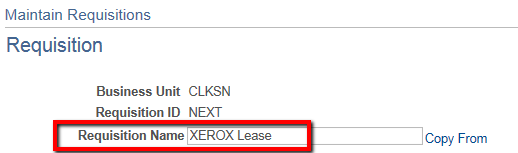
 Enter the Requisition Name. Name the requisition something relevant to be able to search for this requisition in the future. This examples uses XEROX Lease.

-
Use the Copy From feature to search for and retrieve data from a previous requisition of the same nature.
Within the Header section...
-
Enter the Requester (your Login ID)
-
The Requisition Date and Accounting Date will default - do not change these dates
-
If the vendor is going to be performing any services on campus, please indicate as such with the Vendor On-campus checkbox

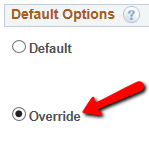
Choose Requisition Defaults

Within Default Options, choose Override
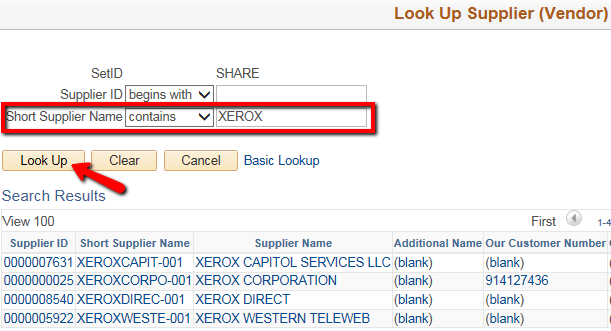
Within the Line section, choose the magnifying glass to search for the Vendor

In the Short Supplier Name field, change the qualifier from "begins with" to "contains" and enter a portion of the vendor name.
-
Hit Look Up
-
Select the appropriate Vendor
The Vendor information will feed back to the Requisition Defaults page.
Check the Supplier Location of the Vendor to make sure it is accurate. If not, click on the magnifying glass for Supplier Location to see if there is more than one address for the Vendor.


If the Vendor name and/or correct address does not appear, complete the Vendor Update Request form located on the Purchasing website. The completed form should be emailed to Accounts Payable at vendorsetup@clarkson.edu. You will be notified when the Vendor has been established/updated in the system.
Within the Schedule section...
-
The Ship To field will default based on the office location associated with your user ID in the PeopleSoft HR system.
-
Enter a Due Date that is 7-10 business days out unless this is an emergency. Otherwise, your order may incur charges for expedited/weekend delivery.
-
Use the Attention To field to provide the Receiving Department the name of the person who ordered the goods or services.
-
Distribute By is used when you are splitting the charges across multiple charge numbers and want the percentage split to be based off the Quantity or Amount


Within the Distribution section...
- Enter the SpeedChart associated with the charge number you are using. For non-equipment purchases, this will populate all the relative charge number fields with the exception of the Account. For Equipment purchases, this will populate all the necessary charge numbers.
- Enter the appropriate Account using the magnifying glass if you need to search for an Account.
- If you are splitting the charges for the entire requisition across several Accounts, enter the appropriate Percent and use the +... icon to add as many additional lines as needed


-
For information on SpeedChart selection, refer to Chartfield Values/SpeedCharts
-
For information on Account selection, refer to Accounts
-
For instructions on splitting line item charges across several departments, projects, and/or grants, refer to Requisition using Multiple Budgets
Hit OK

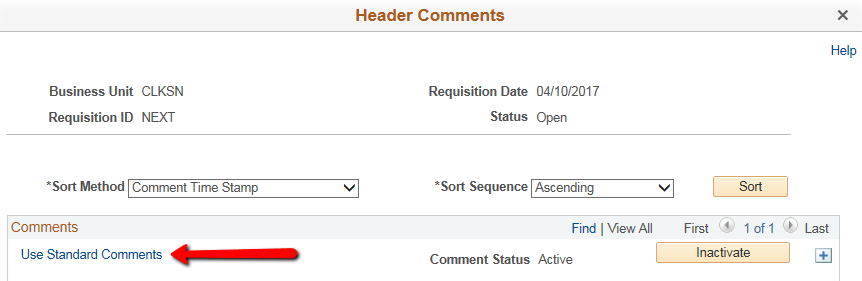
Within the Header section, choose Add Comments

Select Use Standard Comments
 In the Standard Comments pop-up window...
- For Comment Type, choose STD
- For Comment ID, choose REQ
- Hit OK

- The standard comments should now show in the free-form field
- If you have further comments to communicate to Purchasing and other departments, click on the + icon to add another comment field
- Choose
 to view all the comments
 - Enter the additional comment in the second free-form text field. This is a good place to refer to and Attach a quote, invoice, contract, or any other documentation.
- If you want the comment to go to...
- the Vendor, select Send to Supplies
- Accounts Payable, select Show at Voucher
- Receiving, select Show at Receipt
- Requisition Approvers, select Approval Justification

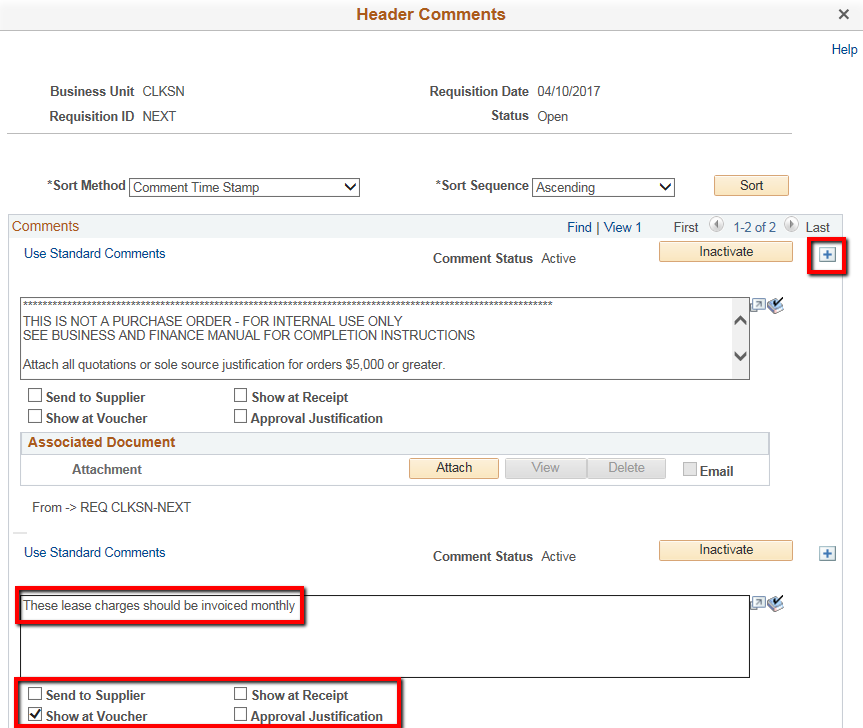
Hit OK

On the Line Details tab...
- Enter a clear description of what you are purchasing. In this example, "Monthly Copier Lease" is more appropriate than "Copier". If you need additional space, use the expansion icon
 to provide a greater level of detail like
- Enter the Quantity
- Enter the UOM = Unit of Measure
- Enter the Price per UOM
- Select any applicable Restrictions (Controlled Substance, Hazardous Material, Radioactive Material, Syringes)
- Use the Line Comments bubble
 to enter comments at the Line level (refer to Add Comments above for instructions on how to do this)
 - Use the Schedule icon
 to change the charge number(s) at the Line level (refer to Requisition using Multiple Budgets for instructions on how to do this)
 - If you need additional lines, use the Add Multiple Rows
 icon (Note: If you have a multiple line quote, each item should have its own line on the requisition)

Save the Requisition


Choose View Approvals to ensure the person needing to approve the requisition is correct, hit Return

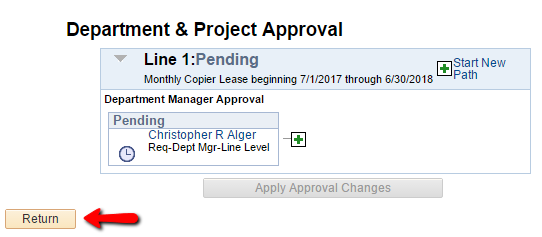
- If the Approver is not correct...
- and the charge number is right, contact the Controller's Office to get the Department/Project/Grant Manager corrected
-
and the charge number needs to be corrected, refer to Requisition using Multiple Budgets
In the upper right side of the screen, select the Budget Check icon


You may receive a budget error or warning, click OK to acknowledge the message

If the Budget Status shows Valid, you can proceed to Submit for Approval

-
If the Approver is not correct...
- and the charge number is right, contact the Controller's Office to get the Department/Project/Grant Manager corrected
- and the charge number needs to be corrected, refer to Requisition using Multiple Budgets
The Status will change to Pending


Save the Requisition
